Blogs
How to Clean Fleet Interiors Properly
Jun
A fleet interior tells on you faster than the paintwork ever will. Drivers notice sticky steering wheels, dusty dashboards and stale odours straight away. Passengers and clients do too. If you want to know how to clean fleet interiors properly, the goal is not just to make them look better for a day. It is to build a repeatable process that keeps vehicles presentable, hygienic and easier to maintain over time.
For fleet managers and operators, interior cleaning sits in that awkward space between presentation and maintenance. Leave it too long and grime becomes harder to remove, trim wears faster, and the cabin starts feeling neglected. Overdo the wrong products and you can create slippery surfaces, residue on glass, or damage to plastics and fabrics. Good results come from the right sequence, the right chemistry and realistic cleaning intervals.
Why fleet interior cleaning needs a system
A one-off deep clean has its place, but most fleets do better with a structured routine. A courier van doing metro runs has different soil loads to a linehaul truck, a pool vehicle or a passenger shuttle. Food crumbs, red dust, drink spills, sunscreen, grease from workshop boots and general body oils all build up differently.
That matters because there is no single product or single method that suits every cabin. Hard plastics, vinyl, fabric seats, rubber mats, carpet, glass and touchpoints all respond best to different cleaners and tools. The practical approach is to treat interior cleaning as a process with three levels – daily touch-up, scheduled maintenance clean and periodic restoration.
The daily clean keeps rubbish, dust and fingerprints under control. The maintenance clean removes embedded grime before it becomes permanent. The restoration clean handles neglected interiors, odours, stains and heavy build-up. If your team only has time for one level, choose maintenance cleaning done consistently over occasional heroic efforts.
How to clean fleet interiors without wasting time
Efficiency starts before the first spray bottle comes out. Set up your team with a standard kit and a fixed order of work. That avoids backtracking and helps different staff produce the same result across the fleet.
Start by removing rubbish, personal items and loose debris. Floor mats should come out first, because once they are removed you can see what has been tracked underneath. A quick dry vacuum before any wet work saves time later. It lifts dust, grit and sand that would otherwise turn to mud once cleaner is applied.
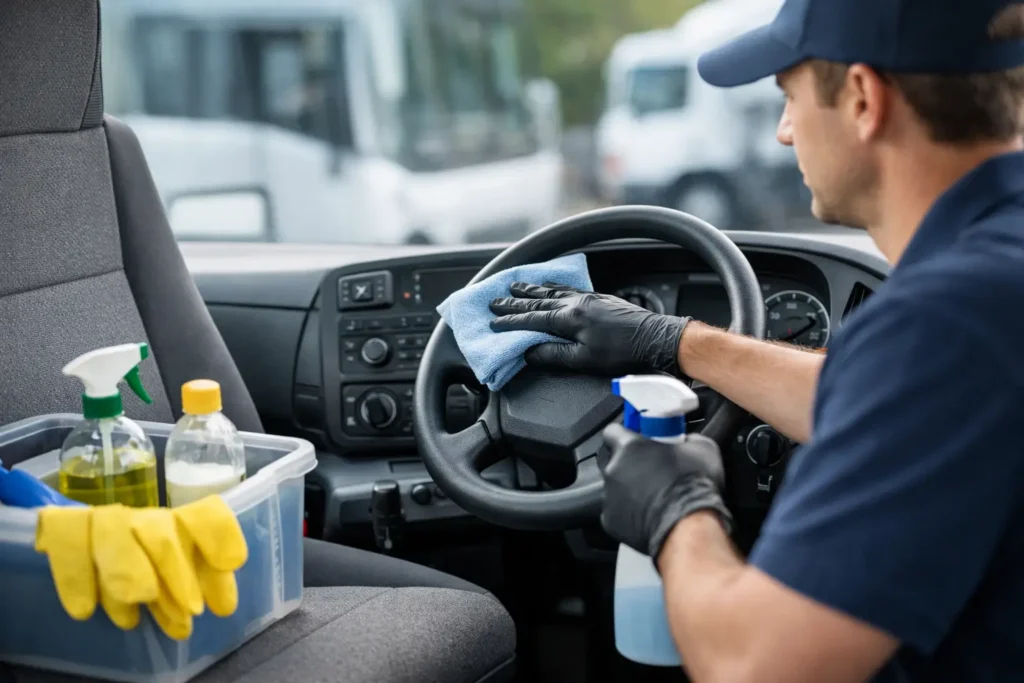
Work from high-touch areas outward. Steering wheels, gear levers, handbrakes, door pulls, handles, seatbelt buckles and switches collect the heaviest grime and need regular attention. Use a suitable interior cleaner on a cloth rather than spraying directly onto electronics or instrument panels. That gives you better control and reduces the chance of overspray settling on glass.
Then move across the dashboard, console, doors and trim. Agitate textured plastics with a soft brush where needed. In commercial vehicles, you often see grime packed into grain lines and around buttons. A brush does more than a heavier dose of chemical in those areas. Let the product do the work, but do not let it dry on the surface.
Seats come next, and this is where many operators lose time. Fabric seats usually need a fabric-safe cleaner and controlled moisture. Too much product can leave wicking marks or slow drying times, which is not ideal when the vehicle has to go back into service quickly. Vinyl or leather-look seating can be cleaned faster, but they still need a non-greasy finish. A glossy dressing might look impressive for ten minutes, but it attracts dust and can make surfaces unpleasant in a working vehicle.
Finish with the floors and glass. Vacuuming after mats and seats have been addressed picks up anything dislodged during cleaning. For carpet and mats, spot treat stains rather than soaking the whole area unless you are doing a deeper extraction job. Interior glass should always be cleaned last, because dashboard products and airborne residue can settle onto it while you work.
Choosing the right chemicals for fleet cabins
The shortest path to poor results is using one strong cleaner on everything. Fleet interiors need products matched to the material and the type of contamination.
For general plastics, vinyl and trim, a dedicated interior cleaner with a controlled finish is the safest starting point. You want effective soil removal without whitening, smearing or leaving the cabin slick. Heavy degreasers have their place in workshop environments, but inside cabins they can be too aggressive on sensitive surfaces.
For fabric and carpet, use a cleaner designed to break down tracked-in dirt, food spills and organic staining without leaving a sticky residue. Residue is what causes rapid resoiling. An interior may look clean when it leaves the bay and then appear dirty again within days because the wrong product was left behind.
Glass cleaner needs to cut film, fingerprints and nicotine haze without streaking. In fleet work, interior glass often carries an oily layer from plastics and air circulation, so technique matters as much as product choice. Two cloths usually work better than one – one to clean, one to buff dry.
Deodorisers help, but they should never replace cleaning. If an odour source is still in the carpet, seat foam or air vents, perfume simply masks the problem for a short time. Proper odour control starts with removing the source, then using a deodorising product as a finishing step.
High-use vehicles need a different standard
When you are cleaning utes, service vans, trucks or shared fleet cars, the challenge is not just dirt. It is wear. Repeated entry and exit grinds abrasive soil into sills, pedals, mats and seat bolsters. Drivers also become blind to gradual decline. The cabin may still feel usable, but to a customer, auditor or new employee it looks tired.
That is why frequency should be based on use, not just time. A truck on long-distance freight routes may need a different interior plan from a branch vehicle used for short urban trips. Shared vehicles generally need more frequent touchpoint cleaning because multiple users multiply the contamination load.
There is also a health and safety angle. Dust on instrument clusters, smeared windscreens, slippery pedals from over-applied dressing and clutter in footwells are all avoidable risks. A clean interior is not just cosmetic. It supports safer operation and better driver acceptance.
Common mistakes when cleaning fleet interiors
The most common error is over-wetting soft surfaces. It slows drying, encourages odours and can create mould issues in humid conditions. Use enough product to clean, not enough to saturate.
The next mistake is applying shiny dressings across dashboards and vinyl. In private vehicles, some people still associate gloss with cleanliness. In fleet vehicles, that often creates glare, attracts dust and leaves a greasy feel on touchpoints. A natural, low-sheen finish is usually the right standard.
Another issue is poor cloth management. If the same cloth is used on door jambs, dashboards and glass, you spread grime around and lose efficiency. Colour-coded microfibres or clearly separated cloth use helps maintain standards, especially across larger teams.
Finally, do not ignore tools. A vacuum with decent suction, soft interior brushes, trigger bottles with reliable spray patterns and proper cloths will outperform a cupboard full of mismatched products. Process and equipment matter as much as chemical strength.
Building a practical interior cleaning schedule
The best schedule is the one your operation will actually follow. For many fleets, a light daily reset and a more thorough weekly or fortnightly interior clean is realistic. Heavier-use vehicles may need touchpoint and glass cleaning every shift, while lower-use pool vehicles can be managed on inspection-based intervals.
Set simple standards your team can check quickly. Mats shaken out or vacuumed. Rubbish removed. Touchpoints wiped. Dash and console dust-free. Seats free of visible stains. Interior glass clear. Odours investigated, not masked. Once standards are written down, quality becomes easier to manage across drivers, depots and contractors.
If your fleet operates across varied New Zealand conditions, from urban delivery routes to rural or construction-linked work, product choice becomes even more important. Soil load, moisture and red dust can change dramatically from one job to the next. A supplier with trade-grade interior chemicals and practical support can save a lot of trial and error.
A clean cabin does more than improve first impressions. It reduces wear, supports hygiene, helps drivers take pride in the vehicle and makes every future clean easier. That is the real value in learning how to clean fleet interiors properly – not chasing showroom perfection, but setting a professional standard your operation can hold week after week.